How to add any website to Windows 10’s Start menu

December 1st, 2015 | Edited by | software

Dec
01

In Windows 10 you’ve got tons of choices for desktop programs, and apps from the Windows Store can be useful too. But there are still probably a few key webpages you turn to every day instead of a desktop program or modern UI app.
Wouldn’t you love to have those key sites available to you on the Windows 10 Start menu? Here’s how to do that.

The Edge way

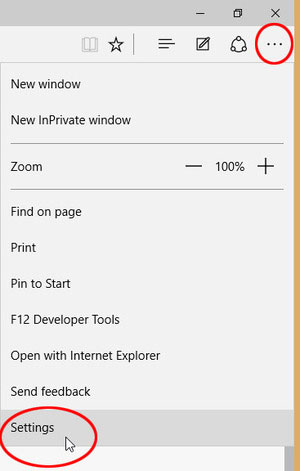
Open Microsoft Edge and then navigate to the page you want to add. In the upper right-hand corner, click the three horizontal dots, and then from the drop down menu select Pin this page to Start. A pop-up window will appear asking you to confirm. Click Yes and you’ll find the site at the bottom of the live tile section in your Start menu.
The downside? This method is that links will only open in Edge. Fortunately, there’s a way around that. If you want links to open in your default browser instead of Edge, you have to use a little bit of trickery, but nothing too complicated.

startmenu

The non-Edge way

Open Internet Explorer and navigate to the webpage you want to add to Start. For our purposes, let’s say it’s Facebook.
Once you’re on Facebook, right-click in an open space on the site and select Create shortcut from the context menu. IE will then show a pop-up window asking if you want to create a desktop shortcut. Click Yes.
To do the same thing in Chrome and Firefox, go to the address bar and click-and-drag the icon to the left of “http,” and drop it on the desktop. The icon will either be a green lock, a rectangular piece of paper, or a globe.
Pro Tip: In my experience, you’ll generally get better looking icons using Internet Explorer for this step.
Next, right-click the desktop icon you just created and select Copy.

Add to Start

Now type “run” into the Cortana/search box. The top choice should be the Run desktop app.
Once Run opens, type in shell:programs, click OK, and an Explorer window will open.
Now just right-click in the main part of that window (be careful not to accidentally open a folder) and select Paste.
Your website is now in Start but it’s buried in the “All apps” list. To remedy this, just click Start > All apps and scroll down to the listing in the alphabetical list. Since we’re doing Facebook we’ll look under “F”.
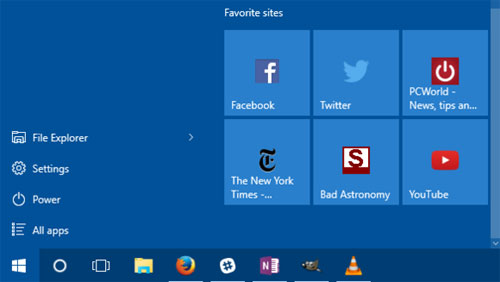
Once you find it, just click-and-drag it onto the live tiles (right) side of the Start menu and you’re done.
After you’ve added your webpages to Start, feel free to delete your shortcuts from the desktop.
If you’d like to take this a step further and add an entire section of websites to Start, check out our earlier tutorial on
customizing the Windows 10 Start menu. This will teach you how to group tiles together.
The catch with websites using the non-Edge method is you can’t remove them from Start through the right-click context menu. Instead, you have to type shell:programs into Run and then delete the shortcuts in the Explorer window that opens.

Source: www.pcworld.com

BitLocker encryption can be defeated with trivial Windows authentication bypass

November 17th, 2015 | Edited by | software

Nov
17

Domain-joined Windows computers that use BitLocker should be patched as soon as possible.

Companies relying on Microsoft BitLocker to encrypt the drives of their employees’ computers should install the latest Windows patches immediately. A researcher disclosed a trivial Windows authentication bypass, fixed earlier this week, that puts data on BitLocker-encrypted drives at risk.
Ian Haken, a researcher with software security testing firm Synopsys, demonstrated the attack Friday at the Black Hat Europe security conference in Amsterdam. The issue affects Windows computers that are part of a domain, a common configuration on enterprise networks.
When domain-based authentication is used on Windows, the user’s password is checked against a computer that serves as domain controller. However, in situations when, for example, a laptop is taken outside of the network and the domain controller cannot be reached, authentication relies on a local credentials cache on the machine.
In order to prevent an attacker from connecting a stolen, lost or unattended laptop to a different network and creating a spoofed domain controller that accepts another password to unlock it, the authentication protocol also verifies that the machine itself is registered on the domain controller using a separate machine password.
This additional check doesn’t happen when the controller cannot be reached, because the protocol developers assumed that the attacker can’t change the user password stored in the local cache. However, Haken figured out a way to do it—and it only takes a few seconds if automated.

bitlockericonhero

How it works

First, the attacker sets up a mock domain controller with the same name as the one the laptop is supposed to connect to. He then creates the same user account on the controller as on the laptop and creates a password for it with a creation date far in the past.
When authentication is attempted with the attacker’s password on the laptop, the domain controller will inform Windows that the password has expired and the user will automatically be prompted to change it. This happens before verifying that the machine is also registered on the controller.
At this point the attacker will have the ability to create a new password on the laptop, which will replace the original one in the local credentials cache.
Logging in while connected to the rogue domain controller would still fail, because the controller does not have the machine password. However, the attacker could disconnect the laptop from the network in order to force a fallback to local authentication, which will now succeed because only the user password is verified against the cache.
This is a logic flaw that has been in the authentication protocol since Windows 2000, the researcher said. However, physical access did not used to be part of the Windows threat model, because in such a situation an attacker could boot from an alternative source, like a live Linux CD to access to the data anyway.
That all changed when BitLocker was introduced in Windows Vista. Microsoft’s full-disk encryption technology, which is available in the professional and enterprise editions of Windows, is specifically designed to protect data in case a computer is stolen or lost—in other words when an unauthorized individual has physical access to it.
BitLocker stores the data encryption key in a Trusted Platform Module (TPM), a secure hardware component that performs cryptographic operations. The key is unsealed from the TPM only if the same boot process is followed as when BitLocker was first activated.
The various stages of the boot process are cryptographically verified, so an attacker with physical access to a BitLocker-enabled laptop will not be able to boot from an alternative OS to read the data stored on its drive. The only possibility left for the attacker in this case is to boot normally to unlock the encryption key and then to bypass the Windows authentication to gain access to the data, which Haken’s attack allows.
Microsoft fixed the vulnerability Tuesday and published the corresponding MS15-122 security bulletin.
This attack shows that when it comes to security, we constantly need to reexamine old truths, Haken said.
BitLocker offers the option to enable preboot authentication using a PIN or a USB drive with a special key on it, in addition to the TPM. However, such configurations are a hard sell for enterprises, because they introduce friction for users and make it difficult for administrators to remotely manage computers, Haken said.
In its own documentation, Microsoft admits that preboot authentication is “unacceptable in the modern IT world, where users expect their devices to turn on instantly and IT requires PCs to be constantly connected to the network.”

Source: www.pcworld.com

How to remove Bing from Edge or Internet Explorer

November 12th, 2015 | Edited by | software

Nov
12

Maybe you like Google. Or Yahoo. Or DuckDuckGo. Choosing your own search engine just takes a few steps.

Microsoft, of course, would rather you used its Bing search engine in its browser running inside its operating system. But you don’t have to. Even if you’d prefer to stay with Microsoft’s browser, you can change that browser’s default search engine.
I’ll give you instructions for both Internet Explorer 11 and Edge.
[Have a tech question? Ask PCWorld Contributing Editor Lincoln Spector. Send your query to answer@pcworld.com.]

Internet Explorer 11

In Internet Explorer, go to the Internet Explorer Gallery webpage. Scroll down a bit, and you’ll find a block of add-ons. Some of them, such as Google and Yahoo, will be clearly labeled as Search.

1109-add-ons


Here’s the unfortunate part: If your preferred search engine isn’t on this page, you can’t make it your default. You can make Google or Yahoo your default, but not, for instance, the privacy-friendly DuckDuckGo.
Click your preferred search engine (or at least the best in the group). This will take you to another webpage, where you can click the Add to Internet Explorer button.
In the resulting Add Search Provider dialog box, check Make this my default search provider and click Add.

dialog-box

That’s it: you’ve changed Internet Explorer’s Search provider.

Edge

Just about any search engine works here, including DuckDuckGo.
First, go to your preferred search engine’s main page. You don’t have to do anything there. You just have to bring up the page in Edge. Then follow these instructions:
1.   Click the menu icon (three dots) in the top-right corner and select Settings

edge-settings

2.   Scroll down the Settings panel, then find and click the View advanced settings button.
3.   Scroll down the Advanced settings panel to “Search in the address bar with.” Click the pull-down menu. You’ll find two options: Bing and <Add new>. Click <Add new>.

edge-add-new

4. Here’ you’ll find all of the search engines you’ve visited. Select the one you want and click Add as default.

edge-add-provider

That’s it. Edge will now default to your favorite search engine.

Source: www.pcworld.com

Cortana coming to the Xbox One in 2016

October 6th, 2015 | Edited by | hardware

Oct
06

Microsoft’s digital assistant arrives on the Xbox One in 2016, but Xbox One Experience Preview testers will get to try it later this year.

xbox-one

On Friday evening, Microsoft’s Larry Hryb—better known as Major Nelson—took to his blog to make a couple announcements. First, a new update to the Xbox Beta app for Windows 10 is on its way. We’ll get to that in a moment, but the big news is that Cortana, Microsoft’s digital assistant technology, will make its way to the Xbox in 2016.
According to Major Nelson, beta testers will get a chance to try Cortana on their Xbox “later this year” when Microsoft releases it through the Xbox One experience preview program. This will allow the company to “ ensure that the experience is tuned for gamers” ahead of its public launch next year. Major Nelson didn’t provide any further details as to when in 2016 you can expect the official version of Cortana for Xbox, however.
The story behind the story: Cortana debuted in Windows Phone 8.1, and Microsoft also built it into Windows 10, so adding it to the Xbox One seems to be the most logical next step. We still don’t know what Cortana for Xbox will be able to do, but it will likely build off of the Xbox One’s existing support for spoken commands via the Kinect controller.

Xbox updates coming for Windows 10

In the meantime, while you’re waiting for Cortana for Xbox One, you may as well check out the latest Xbox Beta app for Windows 10. This new update includes support for a new group text chat feature, the ability to reply directly to notifications, and some new social features, such as an easier way to share in-game achievements and game clips, among other things. The new Xbox Beta app for Windows 10 is available for download now; a general public release date for these features has yet to be announced.

Source: www.pcworld.com

Didn’t ask for Windows 10? Your PC may have downloaded it anyway

September 15th, 2015 | Edited by | software

Sep
15

Microsoft confirms auto-download of massive Windows 10 files, even for users who don’t opt into the upgrade.

Whether you want Windows 10 or not, Microsoft says it may download the files to your PC regardless.
In a statement to the Inquirer, Microsoft confirmed that it automatically downloads Windows 10 installation files on eligible PCs, provided automatic updates are enabled through Windows Update. The download occurs even if users haven’t opted in through the Windows 10 reservation dialog.
“For individuals who have chosen to receive automatic updates through Windows Update, we help upgradable devices get ready for Windows 10 by downloading the files they’ll need if they decide to upgrade,” Microsoft told the Inquirer. “When the upgrade is ready, the customer will be prompted to install Windows 10 on the device.”
When reached for comment, Microsoft told PCWorld that the downloads occurred around the time of Windows 10’s July 29 launch.
Why this matters: Microsoft appears to have crossed a line in its zeal to move people onto its latest operating system. Several reports indicate that the Windows 10 files take up as much as 6GB of storage in a hidden folder, potentially hamstringing machines that don’t have much free space left. Even worse, users who have strict data caps could face hefty overage charges for a massive download that they didn’t even ask for.

windows-10

Bye-bye bandwidth

PCWorld has also heard from several readers on this issue, including one whose data plan has been affected by the automatic download. The reader, who runs a small computer repair shop, did not reserve Windows 10, yet recently noticed 6GB missing from his main desktop.

Upon further investigation, the reader’s daughter—who lives in an area without wired Internet and relies on Verizon Wireless for connectivity—had also automatically downloaded the installation files. “They do not wish to upgrade at this time, as they prefer to stay with Windows 7,” the reader said. “But they’re four days into their wireless plan, and have used more than half of their allowance because of the Windows 10 download.”

The Inquirer also spoke to a reader who said Windows 10 tries to install itself every time the machine is booted. It’s unclear if this is typical behavior for those who haven’t opted into the upgrade.
This isn’t the only instance where Windows 10 has gotten users into trouble with data caps. By default, the system also uses peer-to-peer networking to distribute Windows 10 updates, potentially eating up bandwidth without users’ knowledge.

What you can do

It’s worth noting that Windows Update provides users with a few auto-install options. Enabling “Important” updates provides security and stability fixes, while “Recommended” updates are meant to improve non-critical issues. There’s also a “Microsoft Update” option for other software such as Office. We’ve reached out to Microsoft to see which of these tiers enables the auto-download of Windows 10 files.In the meantime, some users have reported success at removing the files and Windows 10 update prompts by entering the following into command prompt as an administrator:
WUSA /UNINSTALL /KB:3035583code>
This should at least remove Windows 10’s update notifications, but we haven’t confirmed whether it removes the installation files and prevents further downloads.

Source: www.pcworld.com

Page 1 of 41234